 SundayHK
环境
KeyCloak:26.7.0
Nginx: 1.25.3
KeyCloak部署
https://www.keycloak.org/getting-started/getting-started-docker
Nginx 转发
server {
    listen 80;
    server_name sso.sundayhk.com;
    return 301 https://sso.sundayhk.com$request_uri;
    access_log off;
}

server {
    listen 443 ssl;
    http2 on;
    server_name sso.sundayhk.com;
    ssl_certificate      /data/ssl/acme/sundayhk.com.pem;
    ssl_certificate_key  /data/ssl/acme/sundayhk.com.key;

    location /admin {
        allow 192.168.22.0/24;
        allow 13.6.116.112;
        deny all;

        proxy_pass http://192.168.22.37:8080;
        proxy_set_header Host $http_host;
        proxy_set_header X-Real-IP $remote_addr;
        proxy_set_header X-Forwarded-For $proxy_add_x_forwarded_for;
        proxy_set_header X-Forwarded-Proto $scheme;
        proxy_set_header X-Forwarded-Host $host;
        proxy_set_header X-Forwarded-Port $server_port;
        proxy_http_version 1.1;
        proxy_set_header Upgrade $http_upgrade;
        proxy_set_header Connection "upgrade";
    }

    location / {
        proxy_pass http://192.168.22.37:8080;
        proxy_set_header Host $http_host;
        proxy_set_header X-Real-IP $remote_addr;
        proxy_set_header X-Forwarded-For $proxy_add_x_forwarded_for;
        proxy_set_header X-Forwarded-Proto $scheme;
        proxy_set_header X-Forwarded-Host $host;
        proxy_set_header X-Forwarded-Port $server_port;
        proxy_http_version 1.1;
        proxy_set_header Upgrade $http_upgrade;
        proxy_set_header Connection "upgrade";
    }

    access_log /data/logs/nginx/sso.sundayhk.com.log;
}
keycloak+postgres
ADMIN_USER=admin
ADMIN_PASSWORD=CBYCZe6jXXXXXXXXXXXXXX
KEYCLOAK_HOSTNAME=https://sso.sundayhk.com
DB_DATABASE=keycloak
DB_USER=keycloak
DB_PASSWORD=b36VHUpWgXXXXXXXXXXXXXX
# docker-compose.yaml
version: '3.8'
services:
keycloak:
image: quay.io/keycloak/keycloak:26.7.0
container_name: keycloak
command: start
ports:
- "8080:8080"
environment:
- KC_DB=postgres
- KC_DB_URL=jdbc:postgresql://postgres:5432/keycloak
- KC_DB_USERNAME=${DB_USER:-keycloak}
- KC_DB_PASSWORD=${DB_PASSWORD}
# 允许 Keycloak 接收内网/代理发来的 HTTP 流量
- KC_HTTP_ENABLED=true
# 信任前端代理发送的 X-Forwarded-* 请求头(Host、Proto、For 等)
- KC_PROXY_HEADERS=xforwarded
# 告诉 Keycloak 用户真正访问的对外域名/URL(避免重定向到内网 IP)
- KC_HOSTNAME=${KEYCLOAK_HOSTNAME}
# 如果你的 Nginx 与 Keycloak 之间走的是 HTTP 协议,关闭严格的 HTTPS 要求
- KC_HOSTNAME_STRICT_HTTPS=false
# 初始化超级管理员账号
- KC_BOOTSTRAP_ADMIN_USERNAME=${ADMIN_USER}
- KC_BOOTSTRAP_ADMIN_PASSWORD=${ADMIN_PASSWORD}
depends_on:
postgres:
condition: service_healthy
restart: always
postgres:
image: postgres:16-alpine
container_name: keycloak-postgres
environment:
POSTGRES_DB: ${DB_NAME:-keycloak}
POSTGRES_USER: ${DB_USER:-keycloak}
POSTGRES_PASSWORD: ${DB_PASSWORD}
volumes:
- ./postgres_data:/var/lib/postgresql/data
restart: always
healthcheck:
test: ["CMD-SHELL", "pg_isready -U ${DB_USER:-keycloak} -d ${DB_NAME:-keycloak}"]
interval: 5s
timeout: 5s
retries: 5
#volumes:
# postgres_data:
# driver: local登陆 https://sso.sundayhk.com/admin 会提示,解决是创建新的管理员
You are logged in as a temporary admin user. To harden security, create a permanent admin account and delete the temporary one.创建新管理员:Users -> Add user -> Username:新用户名, 如xxxadmin -> Create
设置密码:xxxadmin用户 -> Credentials -> 设置密码 取消Temporary, 避免下次登陆要重置密码
设置权限:Role mapping -> Assign role -> Realm roles : admin -> Assign
注销 使用新管理员xxxadmin登陆后,没问题后,删除admin用户
KeyCloak 配置
https://www.keycloak.org/getting-started/getting-started-docker
登录管理员控制台
- 前往Keycloak 管理控制台 https://sso.sundayhk.com/admin
- 使用您之前创建的用户名和密码登录。
创建一个领域
Keycloak 中的 Realm 相当于一个 Tenant。每个 Realm 都允许管理员创建相互隔离的应用程序和用户组。Keycloak 最初只包含一个名为 <realm_name> 的 Realm master。此 Realm 仅用于管理 Keycloak,不得用于管理任何应用程序。
按照以下步骤创建第一个领域。
- 打开Keycloak 管理控制台。
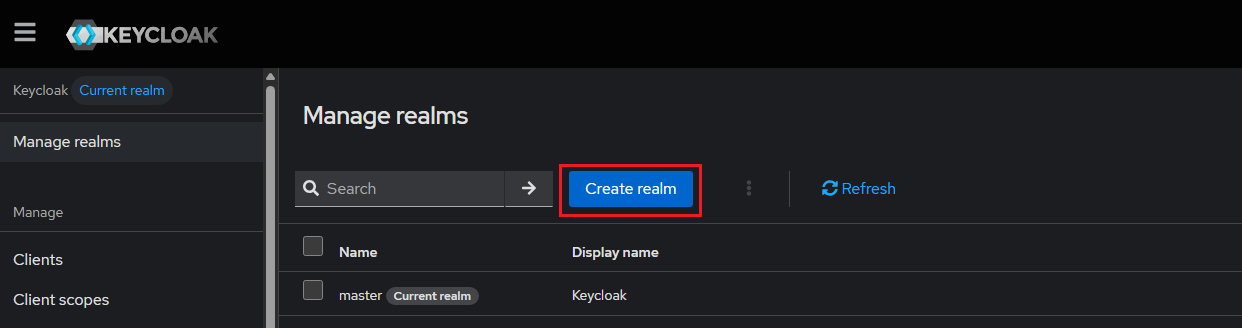
- 点击左侧栏中的Manage realms
- 点击Create realm
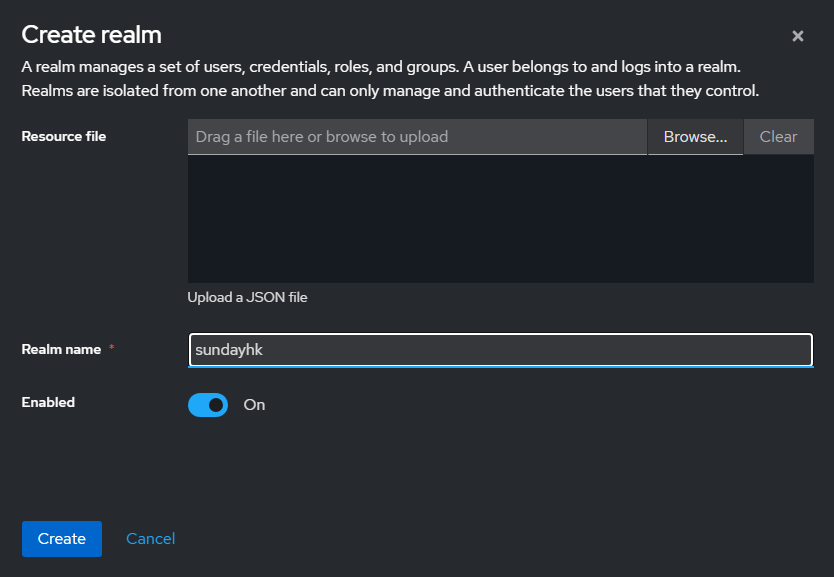
- 在Realm name字段中输入,如sundayhk
- 点击创建。
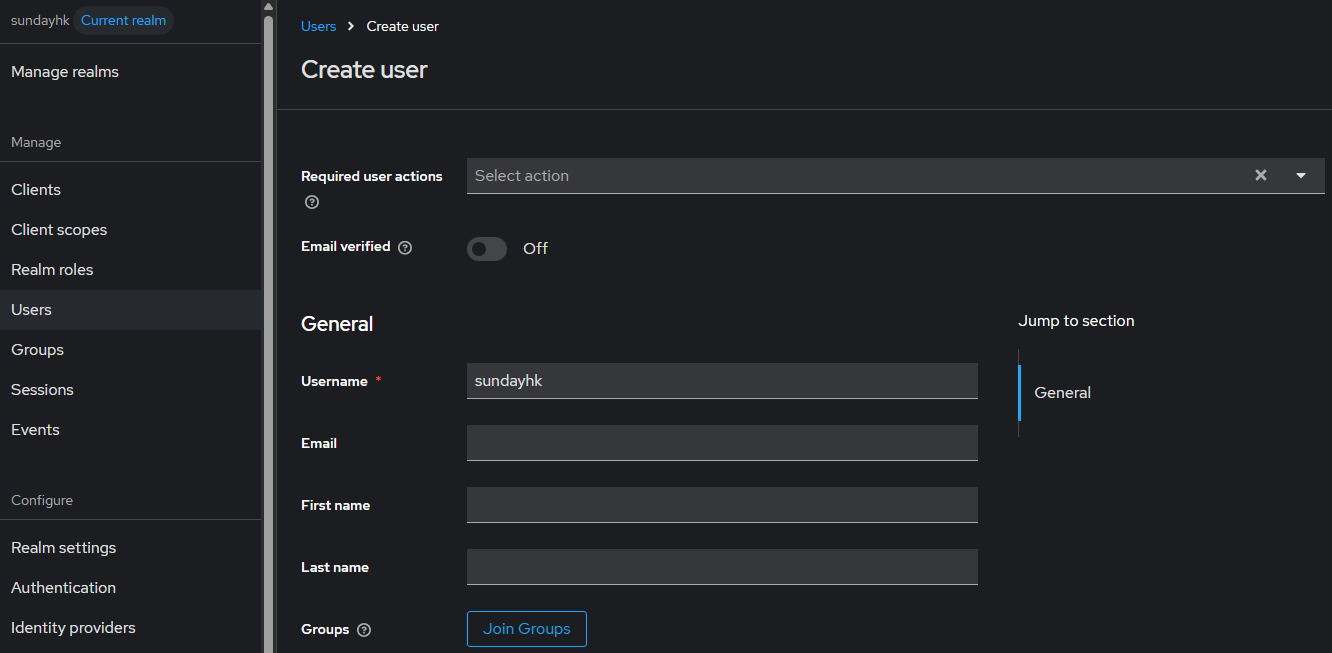
创建用户
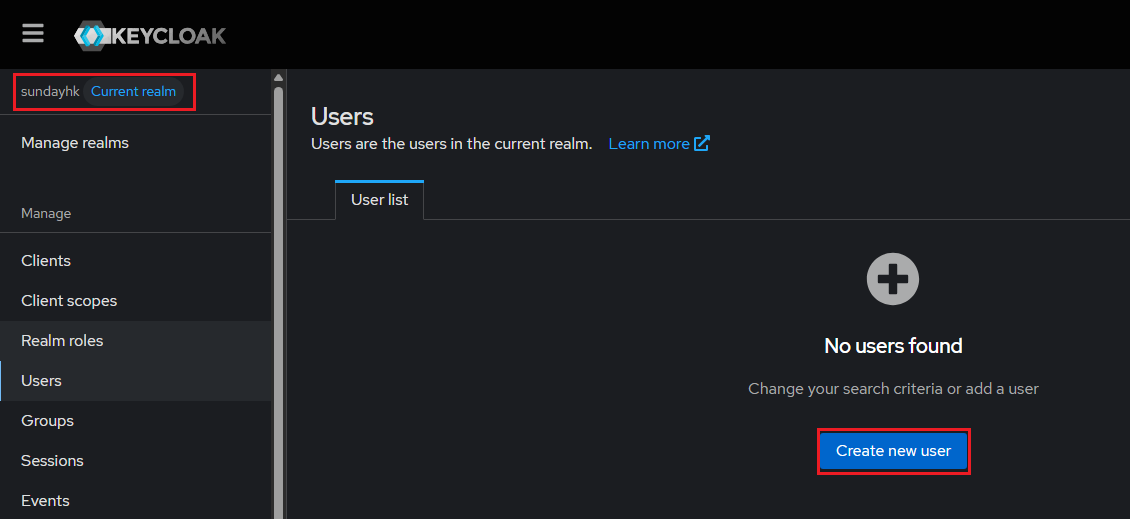
初始状态下,该领域没有任何用户。请按照以下步骤创建用户:
- 请确认您仍在sundayhk域中,该域位于Current 域旁边。
- 点击左侧菜单中的用户
- 点击创建新用户。
点击 credentials 设置密码
将Temporary切换为关闭,这样用户在首次登录时就不需要更新此密码。
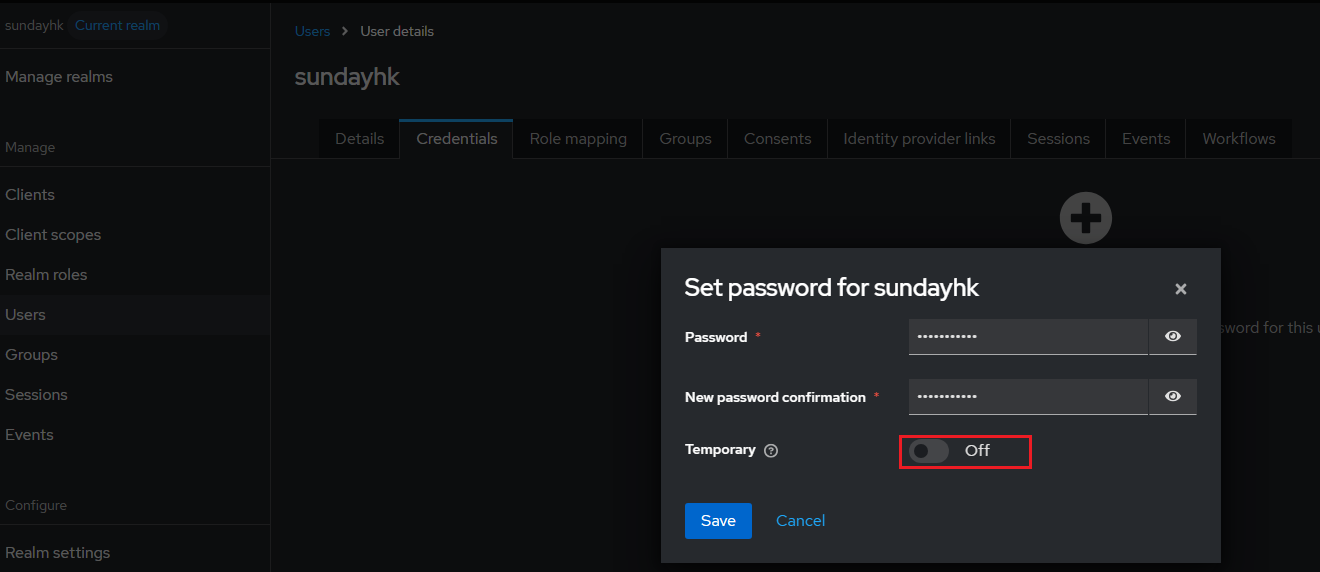
此时会弹窗,需要再次确定,才会设置密码。
登录账户控制台
您现在可以登录账户控制台,验证此用户是否已正确配置。
- 打开 Keycloak 账户控制台 https://sso.sundayhk.com/realms/sundayhk/account
sundayhk使用您之前创建的用户名和密码登录。
作为帐户控制台中的用户,您可以管理您的帐户,包括修改个人资料、添加双因素身份验证以及添加身份提供商帐户。
下面配置 grafana 使用 keycloak登陆
KeyCloak 配置客户端 Grafana
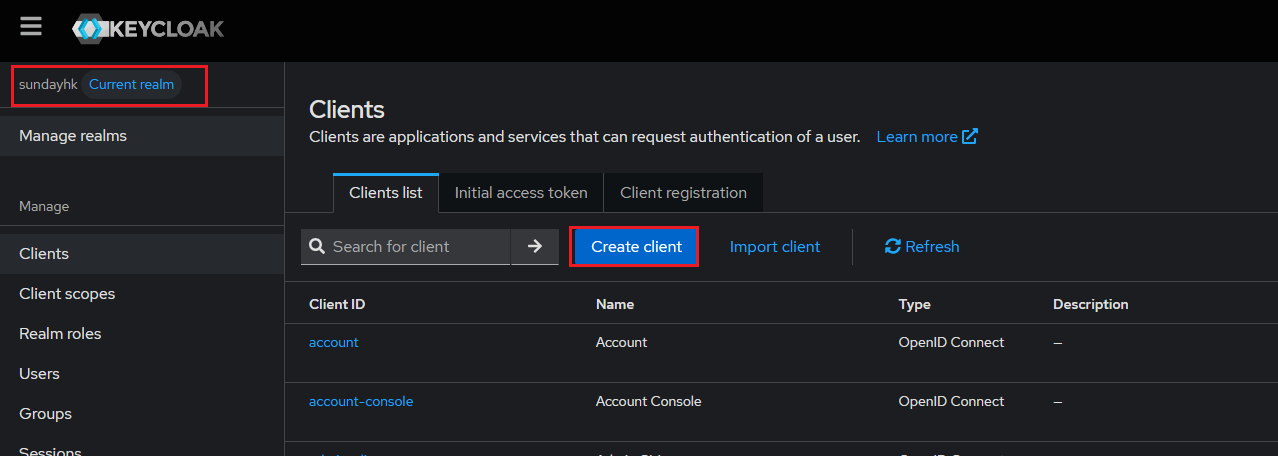
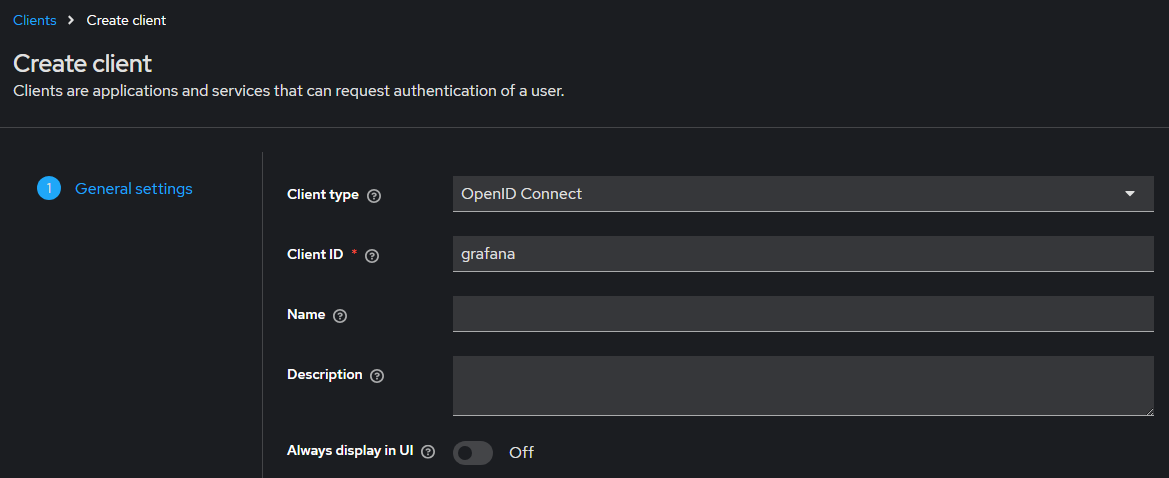
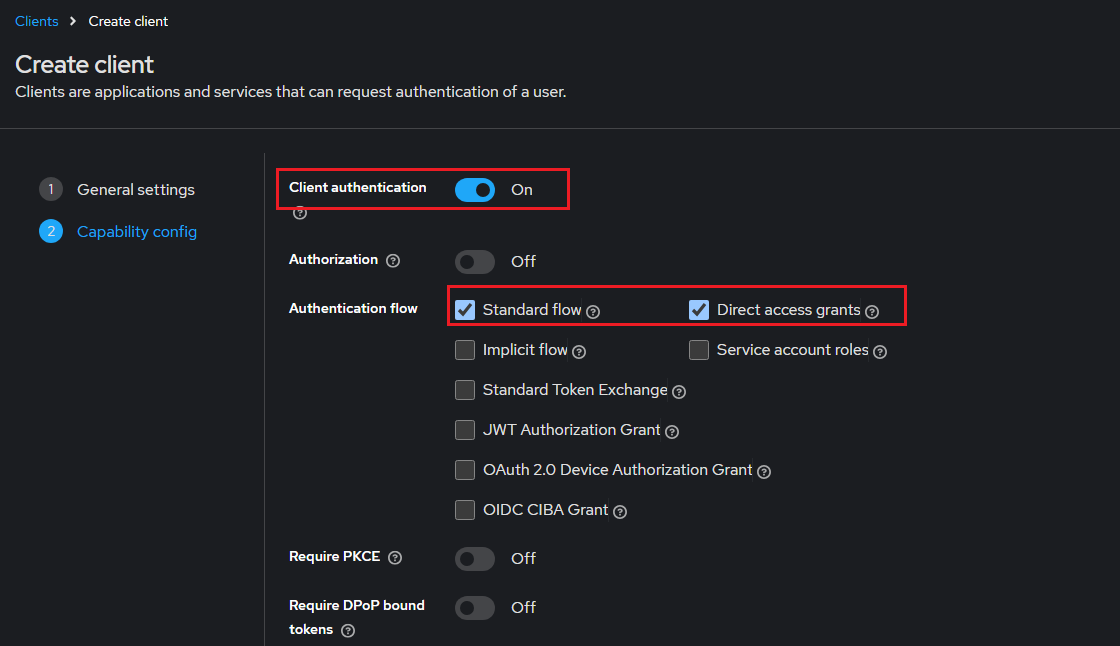
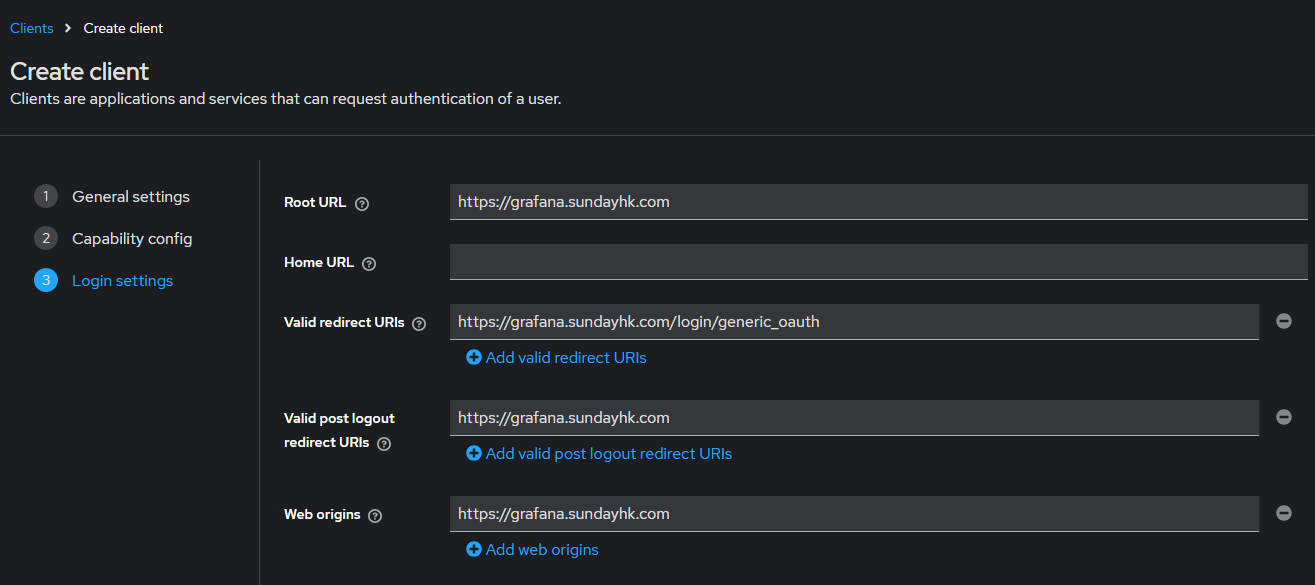
复制密钥 1hb5GNFQbExATBD6ovvqPBJxxxxxxxxxxxxxxxxxxx
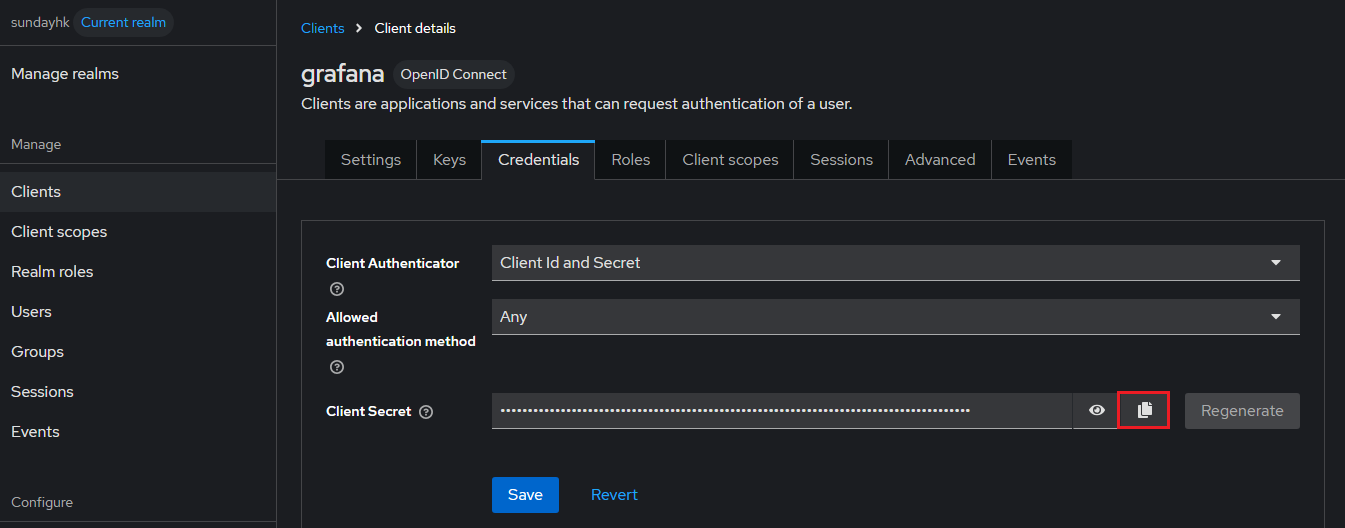
keycloak 26版本 新用户继承的默认角色,就有offline_access,不用额外设置了
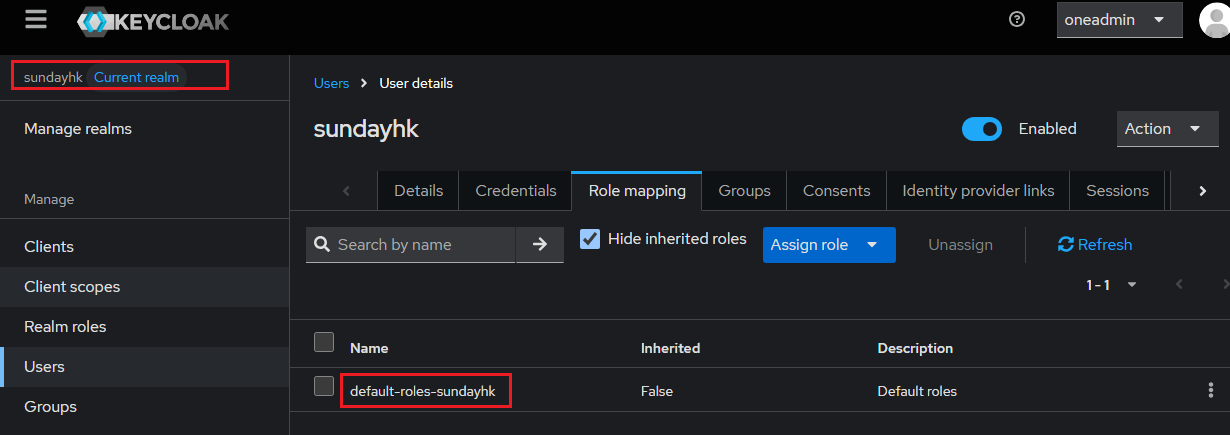
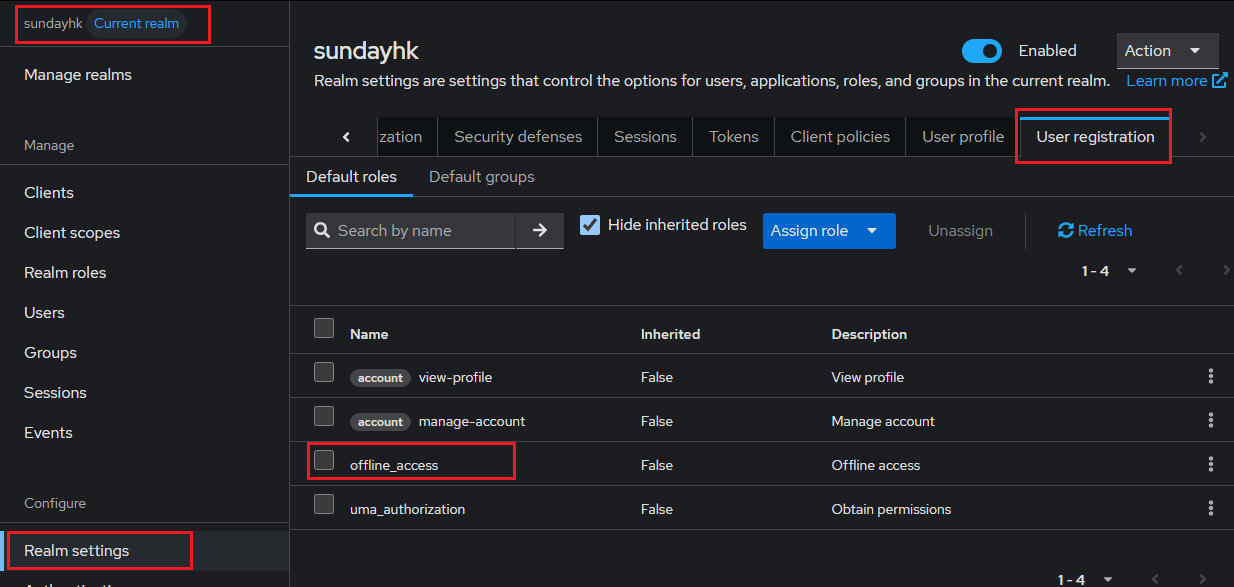
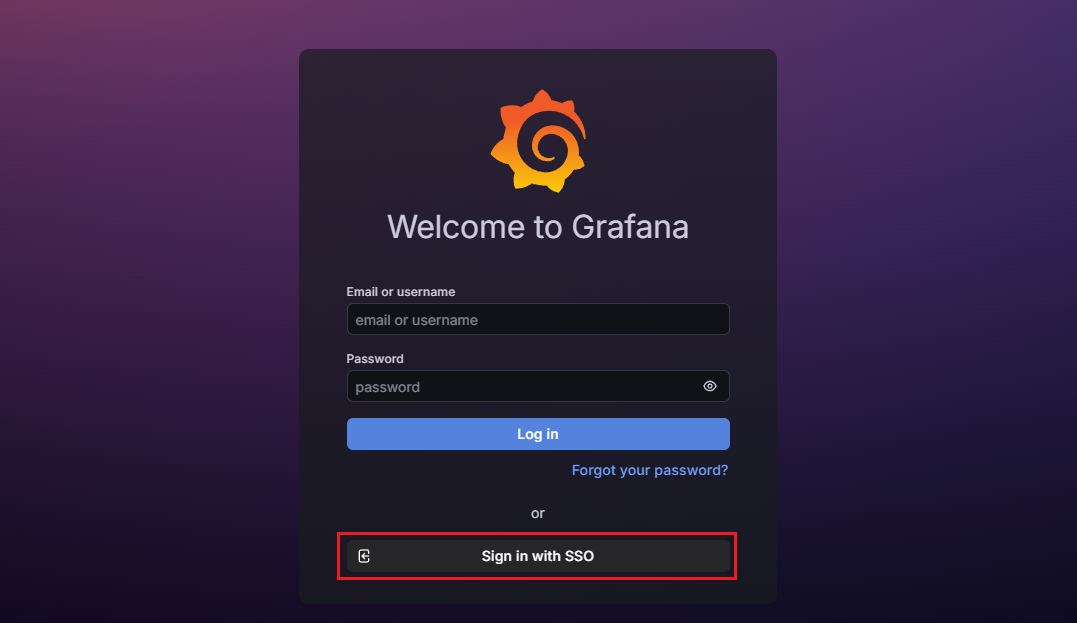
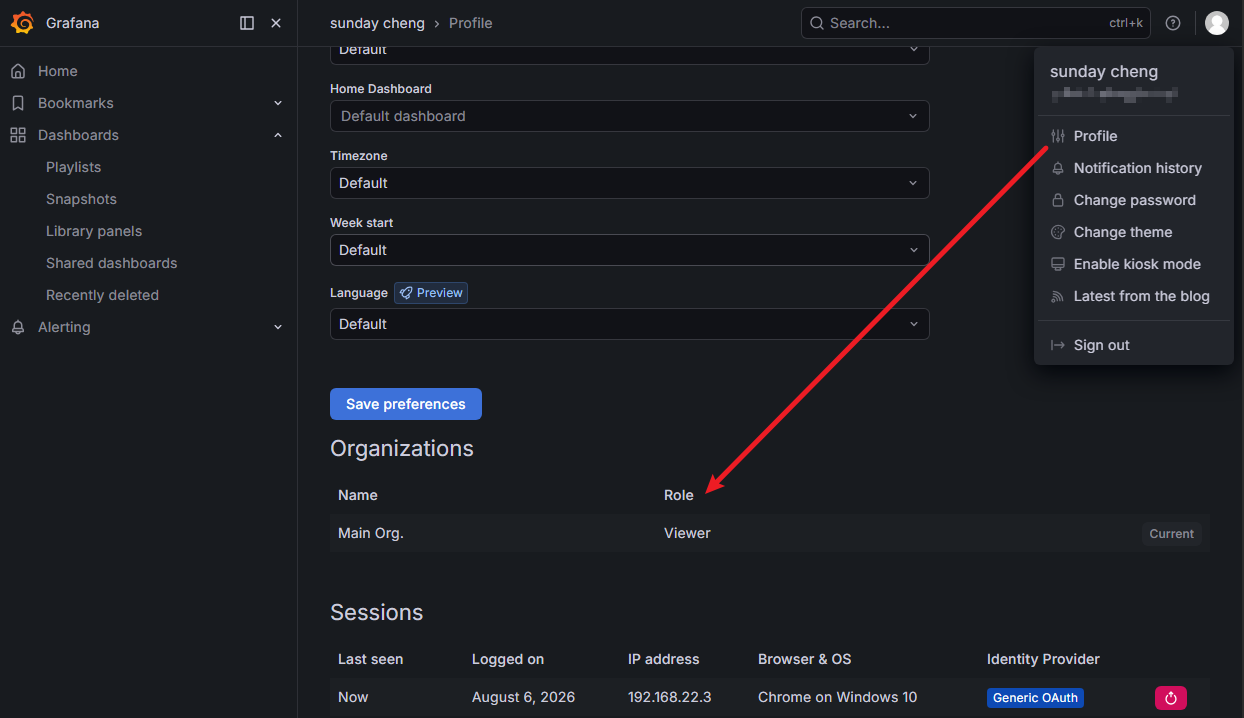
这里暂时不设置权限,grafana使用sso登陆 默认角色是viewer
Grafana部署
# docker-compose.yaml
services:
  grafana:
    image: grafana/grafana:13.0
    container_name: grafana
    restart: unless-stopped
    ports:
      - '3000:3000'
    environment:
        GF_SERVER_ROOT_URL: "https://grafana.sundayhk.com"
        GF_AUTH_GENERIC_OAUTH_ENABLED: "true"
        GF_AUTH_GENERIC_OAUTH_NAME: "SSO"
        GF_AUTH_GENERIC_OAUTH_ALLOW_SIGN_UP: "true"
        GF_AUTH_GENERIC_OAUTH_CLIENT_ID: "grafana"
        GF_AUTH_GENERIC_OAUTH_CLIENT_SECRET: "1hb5GNFQbExATBD6ovvqPBJxxxxxxxxxxxxxxxxxxx"
        GF_AUTH_GENERIC_OAUTH_SCOPES: "openid email profile offline_access roles"
        GF_AUTH_GENERIC_OAUTH_EMAIL_ATTRIBUTE_PATH: "email"
        GF_AUTH_GENERIC_OAUTH_LOGIN_ATTRIBUTE_PATH: "username"
        GF_AUTH_GENERIC_OAUTH_NAME_ATTRIBUTE_PATH: "full_name"
        GF_AUTH_GENERIC_OAUTH_AUTH_URL: "https://sso.sundayhk.com/realms/sundayhk/protocol/openid-connect/auth"
        GF_AUTH_GENERIC_OAUTH_TOKEN_URL: "https://sso.sundayhk.com/realms/sundayhk/protocol/openid-connect/token"
        GF_AUTH_GENERIC_OAUTH_API_URL: "https://sso.sundayhk.com/realms/sundayhk/protocol/openid-connect/userinfo"
        GF_AUTH_GENERIC_OAUTH_ROLE_ATTRIBUTE_PATH: "contains(resource_access.grafana.roles[*], 'admin') && 'Admin' || contains(resource_access.grafana.roles[*], 'editor') && 'Editor' || 'Viewer'"
        GF_AUTH_GENERIC_OAUTH_ALLOW_ASSIGN_GRAFANA_ADMIN: "true"
        GF_AUTH_GENERIC_OAUTH_ROLE_ATTRIBUTE_STRICT: "false"
        #GF_LOG_LEVEL: "debug"

    volumes:
      #- grafana-storage:/var/lib/grafana
      - /etc/localtime:/etc/localtime:ro
      - ./grafana-data:/var/lib/grafana

#volumes:
#  grafana-storage:
mkdir -p ./grafana-data
chown -R 472:472 grafana-dataserver {
listen 80;
listen 443 ssl http2;
server_name grafana.sundayhk.com;
ssl_certificate /data/ssl/acme/sundayhk.com.pem;
ssl_certificate_key /data/ssl/acme/sundayhk.com.key;
location / {
proxy_pass http://192.168.22.26:3000;
proxy_set_header Host $http_host;
proxy_set_header X-Real-IP $remote_addr;
proxy_set_header X-Forwarded-For $proxy_add_x_forwarded_for;
}
access_log /data/logs/nginx/dashboard.sundayhk.com.log;
}
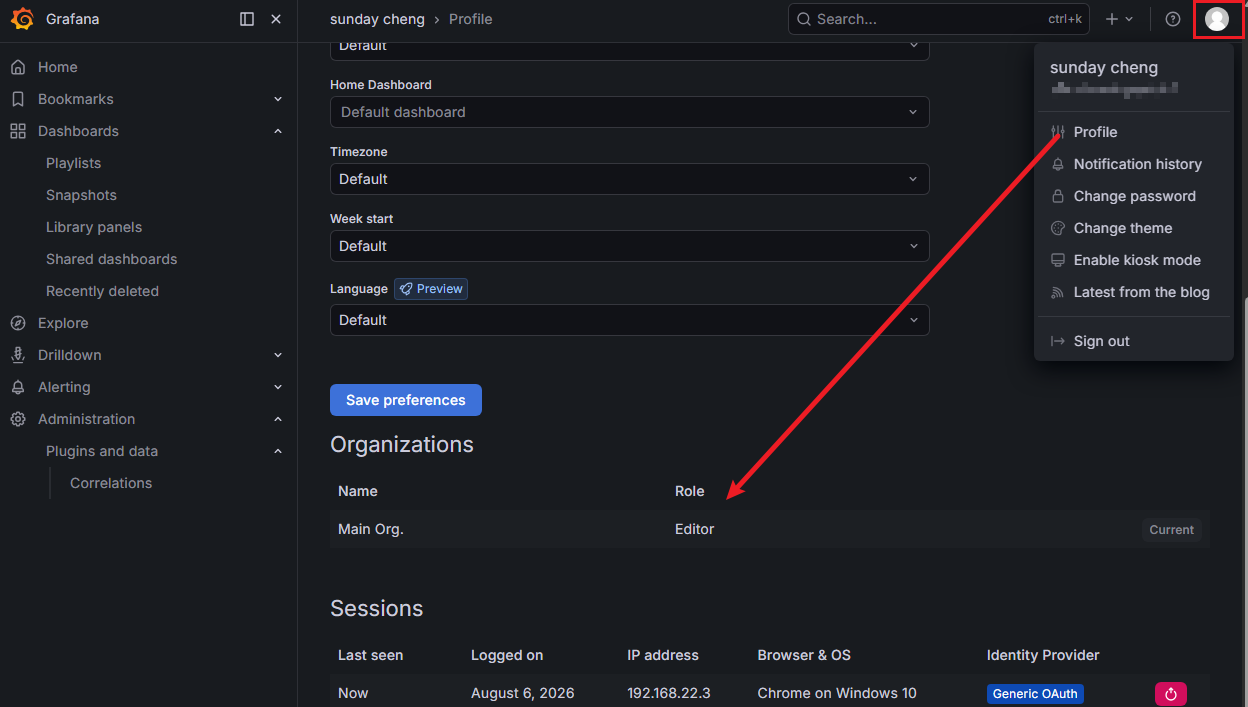
默认是viewer权限
KeyCloak配置Grafana角色
KeyCloak创建角色 admin、editor、viewer
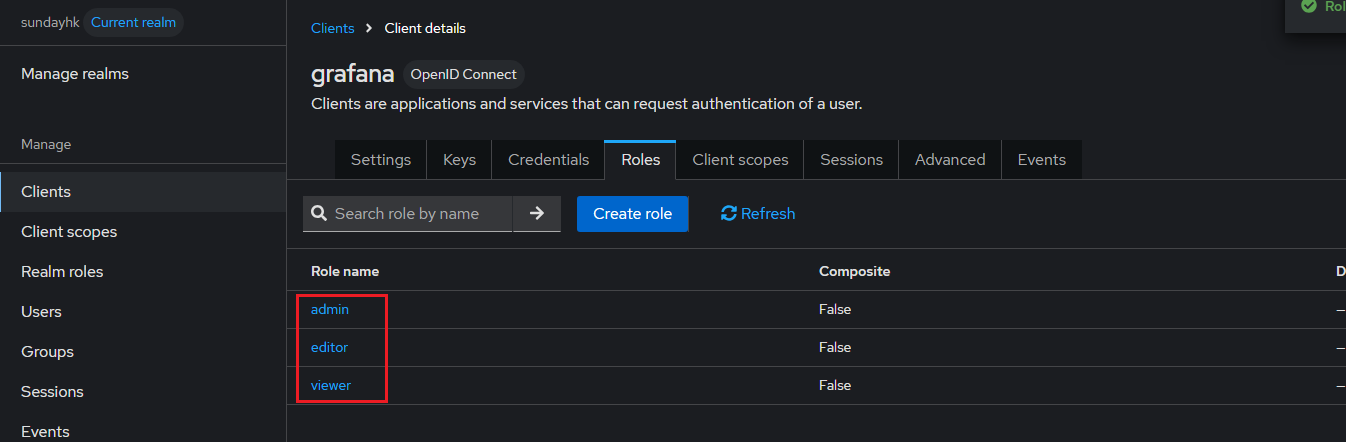
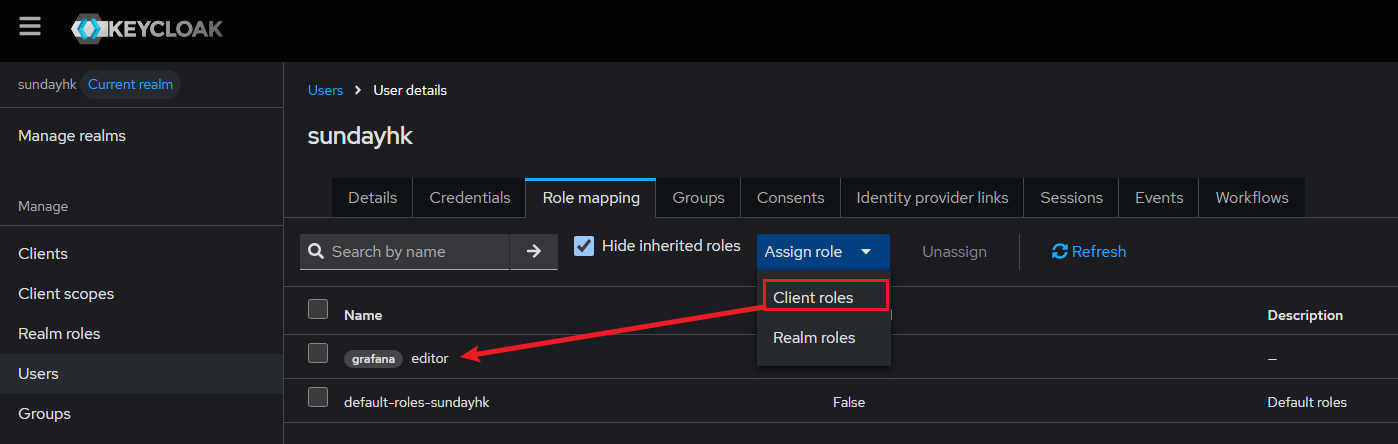
grafana 退出 重新登陆 权限同步为 Editor了